Below is a description of how to change the Fork Seals on a Moto Guzzi EV11.
If you have any doubts or concerns about doing this yourself – then take your motorcycle to a mechanic who is certified to work on your motorcycle.
What you’ll need :
Supplies
FORK OIL (0.95 litres of 10w fork oil – 0.485 litres per fork)
New Fork Seals
New Dust Covers (optional – may be able to reuse old ones)
Grease
Tools
Allen Wrenches (4mm, 5mm, 8mm)
Spanner wrench
ScrewDriver (Phillips + Flathead)
Rubber Mallet
Blocks of wood
Small diameter PVC pipe
Pliers/Cutters
Measuring Cup/Container to catch used oil
Syringe
5/16 x 7/16 tubing (optional)
Fork Seal Replacement
1 – Elevate the front wheel. With the bike on its center stand, prop some blocks of wood under the oil pan until the front tire is off of the ground.
2 – Remove the front brake assemblies. (pic 1) (Use the 8mm allen wrench to remove 2 bolts (blue arrows) from each caliper assembly and slide assembly off of each rotor (red arrow). Gently pry open the brake line retainer wire clips (yellow arrow) and free the brake line. Tie the brake calliper assemblies out of the way (I rest mine behind the engine guards). You don’t want them swinging around and scratching anything.
3 – Remove axle bolt (pic2). Use the spanner wrench (red arrow) that comes with your guzzi toolkit to remove the bolt (blue arrow)
4 – Loosen the axle pinch bolts (pic 3). With the 5mm allen wrench loosen the pinch bolts (blue arrows) at the bottom of each fork
5 – Remove the axle and wheel. Remove the front wheel by using a rubber mallet to gently tap the axle through the fork. Keep track of the spacer that’s between the wheel and the inside left of the axle (yellow arrow).
6 – Drain the Fork oil (pic 4). Place a container under each fork tube to catch the oil. Remove the drain screw (blue arrow) with the 4mm allen wrench. Be carefull not to misplace the rubber O-ring that lives between the drain screw and the fork. Remove the fill screw(pic 5) (blue arrow) at the top each fork tube with a phillips screwdriver to let the oil drain faster.
7 – Loosen (do not remove) the bolt at the bottom of each fork tube (pic 6) by inserting the 8mm allen wrench (yellow arrow) up into the bottom of the fork tube (blue arrow) to loosen the bolt that holds the lower fork tube assemble. It will take a decent amount of torque to loosen these bolts. I used the spark plug socket and the end from and old mirror to give myself extra leverage to free the bolts.
8 – Remove the fender (pic 7). Use the 5 mm allen wrench to remove the 4 bolts (blue arrow) holding the fender and brace to the fork tubes. Gently lift the fender up and rotate (pic 8) so that it can be slid from between the upper forks.
9 – Remove the lower fork tubes. Finish removing the bolts that you loosened in step 7. Slide the fork tube off.
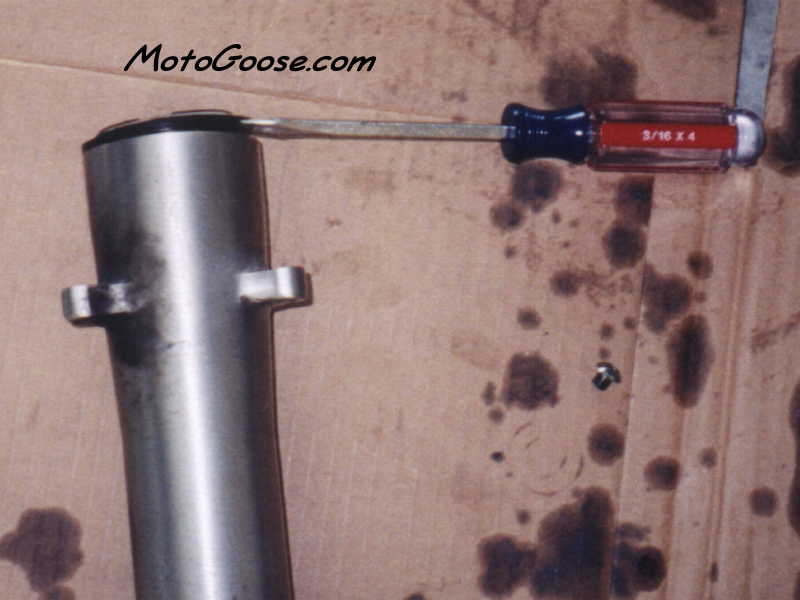
10 – Remove the dust caps. Use a flat head screwdriver (pic 9) to lift the dust cover off of the fork tube. Be very careful not to score/scratch the top of the fork tube.
11 – Remove the retainer clip. With the screwdriver (pic 10) (or pair of pliers) remove the clip (blue arrow) used to retain the fork seal.
12 – Remove the old fork seal. First remove any children or others that are easily offended from the area. Unless you have a special tool for extracting the fork seal this can be very aggravating. The fork seal is a piece of metal covered by a hard plastic shell. It fits very tightly against the fork tube and can be difficult to remove. Sliding a small screwdriver between the fork wall and the seal could prove to be disasterous if the aluminum wall is scratched since the seal would let oil shoot right past it. I used pair of pliers/cutters and cut/pull away at the inside of the seal (pic 10) until it has weakened enough to allow me to collapse it inward. Then it was easilly removed.
13 – Now is a good time to thoroughly clean the fork tube. Be carefull not to loose the small cap that’s now free in the bottom of the fork tube ( it fits over the end of the fork stull attached to the motorcycle).
14 – Prepare to install the new fork seal by removing the small spring on the top – it’s easier to put in in place after the seal then to risk damaging it during installation. Both the top and bottom of the seal have a groove, the groove that is slightly smaller is the one that should be on top.) Also rub some fork oil on the outer edge of the seal – this will help it slide back into place easier..
15 – To install the seals you’ll need something that has a “slightly” smaller diameter than the fork tube (I had an old roll of electrical tape that fit perfectly). A stroll through the plumbing section of you local hardware store may yield some PVC pieces that may work even better. Position the fork seal on top of the fork and using the roll of electrical tape and rubber mallet, gently tap it in place.
16 – Put the spring back on the seal. Apply fork oil to the inside edge of the seal (this will help when we slide the fork tube back on).
17 – With a pair of pliers reinstall the retainer clip.
18 – Install the dust covers. Apply some grease to the outer edge of the cover to help slip it back in place. Remove the spring to prevent damage, then gently tap it in place with the palm of your hand. Put the spring back on.
19 – Reinstall the fork. Make sure the cap (step 13) is back in place at the bottom of the tube. Lube the inside lip of the dust cover with fork oil. Slide the fork tube back on. Tighten the bolt at the bottom of the tube (step 9) to keep the fork tube from sliding off.
20 – Repeat steps 7 – 19 for the other fork.
21 – Replace the fender assembly (step 8) and tighten up the bolts.
22 – Tighten the bolts at the bottom of each fork tube (step 7)
23 – Place the wheel back between the forks and slide the axle back through. Remember that the spacer goes on the left side of the wheel on the inside of the fork (left side assuming you are facing forward while sitting on bike).
24 – Tighten axle bolt with spanner wrench.
25 – Tighten pinch bolts.
26 – Reinstall brake caliper assemblies (step 2)
28 – Put drain screws back in each fork tube.
29 – Refill each fork tube with new oil (fork oil change).
Special Thanks to Rob Sherman who posted detailed instructions to the MGNOC forum for me when I requested info on this procedure.